Design is for everyone
Sorry
Aug 27, 2008 Labels: { Miscellaneous } {0 comments}
I'm really sorry for late in getting new tutorial, since last 2 week i've been appointed to head of design in my college magazine. since then, i had to make all design from front page to the end. yes, some of my friend and my "anak buah" help a bit. But still i am really busy man right now. so hopefully you'd understand.
Thank you for reading.
Section Divider(in magazine)
Labels: { Miscellaneous } {3 comments}
Imagechef
Jul 31, 2008 Labels: { Tutorial } {0 comments}
Today i'll share about a website that makes customize effect.
The website provided :
1. photo frames
2. your own tatoo
3. write message in sand
4. Make a custom soccer jersey with your name, number, and color scheme.
click here for more information
Font potret
Jul 27, 2008 Labels: { Miscellaneous } {1 comments}
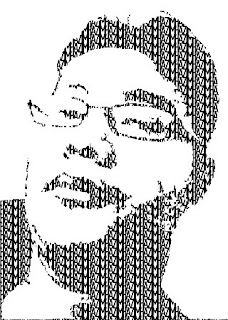
you'll get this extra ordinary picture yourself made by you!

Bashir

Adam


Put_272

FezRee

juju315
Turning to font portret
Labels: { Tutorial } {0 comments}

Impressive? Try this..
1. Take the picture

2. Filter--->Artistic--->Cutout(Number o level=8, Edge Simplicity=0, Edge Fidelity=3)
3. Image--->Adjustments--->Threshold (61)
4. Click
 and create a font field like this
  . which its font layer like
 . I wrote hazim simultaneously.
5. Hold CTRL and right click at "T"
 (sample). It will turn like this
  (click for enlarge)
6. Click at background layer and do layer via copy by (CTRL + C and CTRL + V), layer 1 created. Hide the old background layer by clicking
 (example layer)
7. Then we must create color fill. Click
 --->solid color, Choose white (code: ffffff) and put the layer bottom of layer 1.
8. Crop it
9. Done!
click here for more images
Polaroid Frames
Jul 4, 2008 {0 comments}
this is a website that will turn your picture to polaroid frames. It is fun though'
Try it at http://bighugelabs.com/flickr/hockney.php
example :
Own Fake Magazine
Jun 25, 2008 Labels: { Tutorial } {0 comments}

hye guys..
today,
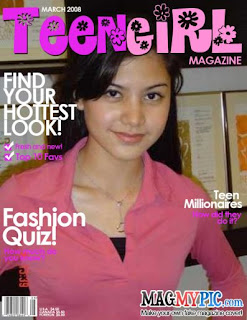
i want share wif u guys about a thing, a website that can make your own cover magazine.
it is suitable for using myspace or friendster or facebook or all of them. There is a tip.
go to this (www.magmypic.com) website and upload your picture.
once done,
1. choose any magazine design that you like. it rather interesting and easy than make it with adobe photoshop.. :)
2. Click small or medium size
3. save to your camputer..
example. :
Prettier face
Jun 18, 2008 Labels: { Tutorial } {0 comments}
This is a way to make any face prettier than before by using adobe.
1. Take this picture.
2. Click "Clone Stamp Tool(s)" , Then with hold "ALT"
and you cursor will automaticly turn like this . Simple right!
3. with holding ALT key, choose any good area for replacing the old ones and click at the ugly area. you must do it carefully or the picture will damage. It may take awhile to do it. I recommended that you cloning at the major area only. it is more simple.
4. Then, click "brush tool(s)"  and right click you picture and click
 After that, choose "basic brush"
 and
and
[Master diameter = 30]
5. Click "Quick Mask Mode (Q)"
6. Choose all area like this
7. Press (Q) for "standard Mode" and also [ CTRL + SHIFT + I]
8. We need a new layer, so press [CTRL + C and CTRL + V ]. You will get a new layer like this
9. Change its blend mode from normal to screen
10. Go to Filter--->Blur--->Gaussian Blur . its radius to 25
11. Flatten image(right click to the layer and choose flatten image) and do a bit adjustment by brightness+7 and contrast+1.
12. Done! Good luck
How to download brush
Jun 8, 2008 Labels: { Tutorial } {0 comments}
i wrote this topic because there are a lot of people want to download brush. Brush is important to make any design better and nice.This is an example :
The method to get brush
1. Click this [link]
2. Choose any brush you like.
3. Download it. !!!
4. copy
5. and paste to Program Files\Adobe\Adobe Photoshop CS2\Presets\Brushes
Mirror image
Labels: { Tutorial } {4 comments}
This is my first tutorial. I thought i might may share something interesting in adobe. in what i learned so far.
This is the Result
The Method are
1. create a background like this
2. Put any words you like. Im using ThisArtGallery word. If you want to make it easier. i recommended you follow mine in learning. as you can see im using AvantGarde LT Medium font.

3. Then you must duplicated the font by click on the layer and (CTRL + J),after that change its name to shadow.
 . IMPORTANT: you must rasterizing the layer (filter--->artistic--->cutout : edge of simplicity=0)
4. Edit---->Free Transform (CTRL + T). Then turn it upside down like this:

5. Then, click square marquee tool (M) at the left panel
 and change its feather to 20%
6. Do this :
 and click DELETE on your keyboard. It will turn like this :
7. Change it opacity to 50%. and (CTRL + D)
8. Make a stroke (Optional)
9. Done.


