this is a simple tutorial of stencil art from photoshop that i found in the internet recently.
1. take this picture :

2. duplicated it (CTRL + J) it look like this :
 3. make the first layer(Layer 1 copy) invisible by clicking "eye symbol"
4. click Layer 1 to select layer.
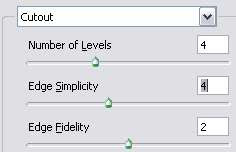
5. Then, go to Filter > Artistic > Cutout. Adjust the settings on the right until you get something like this:

Here's my settings. Yours can be different depending on your image :
 6. Select Layer 1 layer.
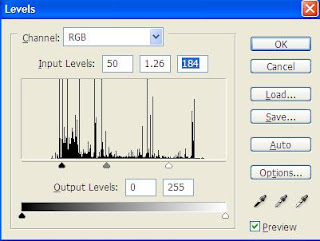
7. Now some adjustment needed. we'll start by hue/saturation (Layer > New Adjustment Layer > Hue/Saturation.then click ok ,so Set the Master Saturation to -100.)
8. Go to Layer > New Adjustment Layer > Levels . This might help you :
 9. Go to Layer > New Adjustment Layer > Brightness/Contrast . You may adjust until your eyes comfortable. (eg: Brightness : 37 , Contrast : 5 )
10. Move Layer copy 1 top of Layer 1 and background.
11. Change its blending option to ( Lighten, opacity:68 or Overlay, opacity, 50 ).
This is the result :
 Thanks to :best-photoshop-tutorials
Examples are shown below :


click here for original tutorial
0 comments:
Post a Comment